Garaetteok (Rice Cake Recipe)
Save it, plan it, shop for it.
Supper turns recipes like this into a planned week and a sorted grocery list — then walks you through cooking, hands-free. Coming soon to iOS.
Ingredients
Serves 4- 1 Tbsp cornstarch
- 1/4 cups water ((for steamer version, 60g), boiled)
- 3/4 cups water ((for microwave version, 175g), boiled, divided into three sets of 1/4 cups)
- 1 tsp fine salt
- 2 cups wet-milled rice flour ((300g), from short or medium grain (e.g. sushi rice))
- 1/2 tsp sesame oil
Open in Supper to scale servings and turn this into a grocery list.
Steps
- Step 1
Rinse 2.5 cups of rice (short-grain or medium-grain rice, such as sushi rice, 535 g / 1.17 lb) under cold water until the water runs clear. Transfer the rice to a medium bowl and add enough water to fully submerge it. Cover and soak for about 12 hours or overnight.
- Step 2
Drain the rice well and let it sit in a fine-mesh strainer at room temperature for about 1 hour to remove excess surface moisture. For reference, the soaked rice will weigh roughly 697 g (1.53 lb) once fully hydrated.
- Step 3
Grind the rice in a powerful food processor until it becomes a fine, flour-like powder. If needed, work in batches so the rice grinds more evenly. Stop periodically to scrape down the sides and redistribute the rice so it grinds evenly.
- Step 4
Sift the rice flour into a clean bowl in two or three batches, as it sifts more easily in smaller quantities. Remove any clumps or unground rice grains. Once all the flour has been sifted, sift it one more time to ensure it is very fine.If you find a noticeable amount of unground rice, return it to the food processor and grind it again, then sift once more. In our testing, we ran the rice through the grinder more than once to achieve an extra-fine texture. This step is important for smooth garaetteok, as insufficiently fine flour can result in gritty rice cakes.You should end up with about 4.5 cups of fine rice flour.
- Step 5
Combine the rice flour, cornstarch, fine salt, and 1/4 cup of boiling water in a microwave-safe bowl. Mix well. Add another 1/4 cup of boiling water and mix again until smooth. The mixture should be easy to stir, not stiff like cookie dough.
- Step 6
Cover the bowl with cling wrap, leaving a small gap for steam to escape. Microwave on high for 2 minutes (based on a 1250 W microwave).
- Step 7
Carefully remove the bowl, add another 1/4 cup of boiling water, and mix well. Cover again and microwave on high for a further 1 minute 30 seconds. Remove from the microwave.
- Step 8
Line a cutting board with a silicone baking mat or several layers of cling wrap to prevent sticking. Carefully transfer the hot rice cake dough onto the prepared surface.
- Step 9
Put on thick cotton gloves first, then food-safe gloves over them, as the dough will be very hot. Alternatively, you can use a single pair of thick, heat-resistant, food-safe gloves if you have them. Knead the dough, then pound it with a pestle for about 5 minutes until smooth and elastic.
- Step 10
Divide the rice cake dough evenly into 5 pieces.
- Step 11
Line the steamer with a silicone steaming mat (recommended), baking paper with a few holes poked in to allow steam to pass through, or a clean tea towel. Spread the rice flour mixture evenly over the liner, breaking it up into smaller pieces rather than leaving it as one solid mass. This helps it cook through more quickly and evenly. Cover and steam over high heat for 15 minutes.
- Step 12
Line a cutting board with a silicone baking mat or several layers of cling wrap to prevent sticking while shaping the rice cake. Place the steamed rice cake dough on the mat.
- Step 13
Put on thick cotton gloves first, then food-safe gloves over them, as the dough will be very hot. Alternatively, you can use a single pair of thick, heat-resistant, food-safe gloves if you have them. Knead the dough, then pound it with a pestle for about 5 minutes until smooth and elastic.
- Step 14
Divide the rice cake dough evenly into 5 pieces.
- Step 15
Lightly coat your palms with about 1/2 teaspoon of sesame oil and gently rub it over the rice cake pieces to prevent sticking.
- Step 16
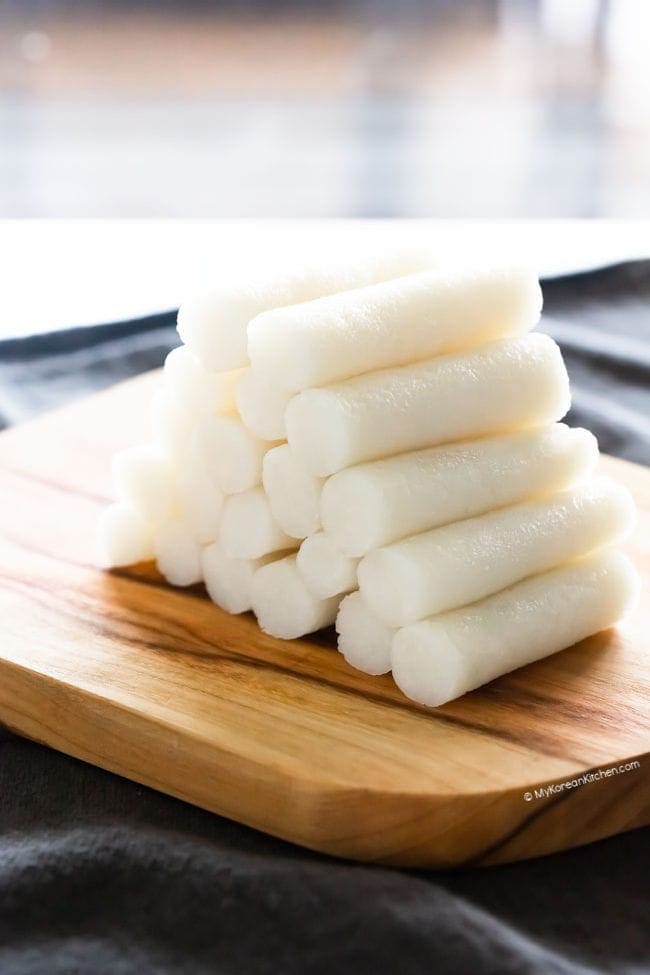
Roll each piece into a cylinder about 1 to 1.5 cm (0.4 to 0.6 inch) in diameter. Trim the ends, then cut the cylinders into 6 cm (about 2.5 inch) lengths, roughly the size of a little finger. The rice cakes are now ready to use in tteokbokki or other stir-fry dishes.
- Step 17
Divide the rice cake dough evenly into 2 pieces.
- Step 18
Lightly coat your palms with about 1/2 teaspoon of sesame oil and gently rub it over the rice cake pieces to prevent sticking. Roll each piece into a cylinder about 2 to 3 cm (0.8 to 1.2 inch) in diameter.
- Step 19
Place the rice cakes on a large plate, cover with cling wrap, and refrigerate for about 1 hour until firm, which makes them easier to slice. Slice thinly (about 0.5 cm / 0.2 inch thick) on a diagonal into oval shapes. If you’re short on time, you can slice them soon after shaping, but chilling is recommended for cleaner cuts. The rice cakes are now ready to use in tteokguk.
Interactive, hands-free timers are available in the Supper app.
Rinse 2.5 cups of rice (short-grain or medium-grain rice, such as sushi rice, 535 g / 1.17 lb) under cold water until the water runs clear. Transfer the rice to a medium bowl and add enough water to fully submerge it. Cover and soak for about 12 hours or overnight.
Source: My Korean Kitchen
